Manual Mode Online Photography Course
How to Shoot in Full Manual

6 Lesson Guides | 9 Videos
self-paced online course
[?]
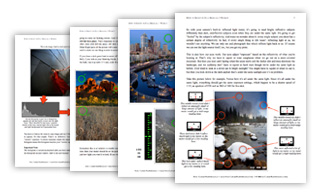
- 139 Pages of Material
- 2 Hours of Video
- Unlimited Email Support
- Lifetime Course Access
- Satisfaction Guaranteed [?]
$200 Now $99
Add to Cart
"I’ve taken several photography classes in the past but none have explained manual metering in such a straight forward and concise manner as you have."
- Ken, course graduate | More Testimonials
Course Summary
If you're sick of shooting in the auto modes and relying on your camera to figure out your settings, it's time to take control of your photos and learn how to take pictures in manual mode with confidence, accuracy and predictability. Learn the correct way to read your camera's light meter, learn why lining the meter up at zero doesn't work, and learn how to get predictable results that match what you envision.
I've organized this eye-opening online photography course to teach you manual photography in words anyone can understand. With my easy 3-step process for manual metering, tons of helpful examples, illustrations, diagrams and videos, you'll be taking pictures like a pro by the time you're finished - and that goes for any type of photography, be it landscape photography, portrait photography, travel photography, street photography, wildlife photography, maternity, children, sports, anything! Download the free online photography course preview today!
Online Photography Course Outline
- Lesson #1: Exposure Fundamentals, Stops & Shutter Speed
- Exposure fundamentals
- What exposure really is and how you can control it
- How you can create different effects with different combinations of settings
- What your 3 exposure tools are and where they are located in your camera
- Video #1: The Inner Workings of Your Camera
- Stops
- What a stop is
- Why stops are so important to understand in photography
- What stops have to do with the shutter speed, aperture and ISO
- Exposure Tool #1: The Shutter Speed
- What the shutter speed is
- How the shutter speed is measured
- What stops have to do with the shutter speed
- How the shutter speed affects the image
- How the shutter speed impacts exposure when shooting in Manual
- What shutter speeds you should use
- What shutter speeds you can use
- What shutter speeds are acceptable to handhold your camera (it's not 1/60!)
- Video #2: The Shutter Speed Explained
- Lesson #2: The Aperture: An In-Depth Explanation
- The aperture explained
- What the aperture is
- What the heck is an f-stop?
- What stops have to do with the aperture
- How the aperture affects the image
- How the aperture impacts exposure when shooting in Manual
- What depth of field is and how to change it
- What 2 other lesser-known variables affect depth of field
- What the depth of field preview button is and how to use it
- How to get those blurry backgrounds
- How to get everything in focus
- Video #3: The Aperture Explained
- Lesson #3: The ISO & Putting it all Together
- ISO explained
- What the ISO is and why it's called the ISO
- What stops have to do with the ISO
- How the ISO affects the image
- How the ISO impacts exposure when shooting in Manual
- When to change the ISO and what to change it to
- What ISOs you should use
- What ISOs you can use
- Video #4: The ISO Explained
- Putting it all together
- How to "juggle" the shutter speed, aperture and ISO when shooting in Manual
- How the shutter speed, aperture and ISO interact with each other
- How to use one of them to get the others where you want them
- Getting the combination of shutter, aperture and ISO to create the image you envisioned
- Video #5: Bringing it all Together
- Lesson #4: Your Camera's Light Meter & Its Limitations
- Your Light Meter
- The difference between incident and reflected light meters
- Why reflected light meters can get "fooled"
- How your camera's light meter thinks
- How to use your camera's light meter correctly
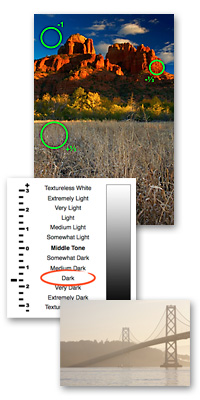
- The Crux of Metering: Middle Tone
- What middle tone is
- Why middle tone is important to manual metering
- Reading Your Light Meter
- What your light meter is really telling you
- How to read your light meter indicator
- How to move the light meter indicator
- What the "zero" point on your meter really means
- Video #6: How Your Meter Works
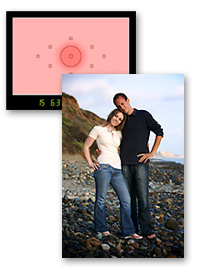
- Metering Modes
- What Evaluative or Matrix metering mode is and when to use it
- What Center-Weighted Average metering mode is and when to use it
- What Spot metering mode is and when to use it
- What the metering mode symbols on your Nikon or Canon camera mean
- Lesson #5: How to Find the Correct Settings in Full Manual
- Dynamic Range
- What the dynamic range of your camera is
- Why your camera can't record a scene like you see it with your eyes
- Why skies often blow out and shadows turn black in pictures
- How to use your camera's narrow dynamic range to your advantage
- Video #7: Dynamic Range
- How to Find the Correct Settings
- What is a technically "correct exposure"
- How to get a correct exposure - the 3 steps to manually metering any scene
- Tons of examples of the manual metering process
- Where to line up your light meter indicator when manual metering
- How to use spot metering when shooting in Manual
- How to figure out which combination of shutter speed, aperture and ISO to use for your picture
- Video #8: The 3 Steps to Manual Metering
- Lesson #6: Advanced Tips & Techniques for Shooting in Full Manual
- Checking Your Exposure
- How to check your exposure before you take the shot
- How to check your exposure after you take the shot
- How to read a histogram
- How to use the histogram to catch incorrect exposures
- What are "blinkies" and how to use them to catch incorrect exposures
- Video #9: Checking Exposure Before You Take the Picture
- How to get the slowest or fastest shutter speed possible
- Quickly set up your camera to freeze or blur motion in any scenario
- How to meter for backlit scenarios
- How to make the foreground of a backlit scene look correct
- How to create a silhouette in manual metering
Who's This Course For?
Intermediate to Advanced
This online photography course is designed for those who wants to take their photography to the next level by learning manual photography. This course is marked for Intermediate to Advanced shooters, but that really just means you are relatively comfortable with your camera and that you aren't brand spankin' new to digital photography. If you consider yourself a beginner, please see the note in the "Requirements" section below.
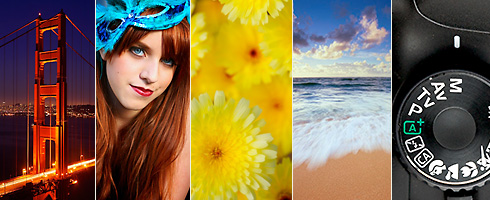
This course teaches you how to shoot in full manual regardless of subject matter - landscapes, portraits, travel, nature, macro, cityscapes, anything. It's not restricted to only nature photography.
This course covers shutter speed, aperture and ISO in-depth, so you don't need to know what those are before starting this online photography course. If you do already have a pretty good grasp of shutter speed, aperture and ISO, don't worry, you won't be bored with the material. I go into shutter, aperture and ISO more in-depth than most and it's always good to review the information until it becomes second nature. Plus, I get in to much more advanced material of manual metering after covering these things. Shutter, aperture and ISO are only the first half of the course, and unless you're a seasoned pro already, you'll learn something new about each one of these.
If you’re still unsure whether this course is right for you, email me at .
Note:
If you're looking at doing the "Filters for Nature Photography" online photography course at some point in the future, keep in mind that completion of this "How to Shoot in Full Manual" course is a prerequisite. If you plan on doing both, check out the package deals here for discounted enrollment fees.
Requirements
To get the full benefit from this course, the following are required:
- DSLR camera - mirrorless compact camera also okay (any brand)
- Tripod strongly recommended (but not required)
- No prerequisites required, but completion of the "Introduction to DSLR Photography" Online Course strongly recommended for beginners - buy both together and save!
There are no prerequisites for this online photography course, but if you are brand new to DSLR photography, I'd recommend you complete the Introduction to DSLR Photography online photography course before doing this one.
An SLR camera or mirrorless compact digital camera is required for this course. The brand of your camera doesn’t matter, but I specifically address only Nikon and Canon cameras in the course materials. All of the principles discussed, however, apply to all DSLR cameras (regardless of brand) and can be used by anyone with any DSLR or mirrorless compact camera. I strongly recommend you have a tripod. A lack of tripod will greatly limit your ability to complete assignments and play with the new tools you've learned.
What's Included
This online photography course is composed of:
- 6 lesson guides
- 139 pages in all
- 218 example images
- 136 illustrations and diagrams
- 6 assignments
- 9 video presentations
- Unlimited email support from Nick Carver
- Assignment feedback and critiques
- Lifetime course access
This is a "work at your own pace" course, which means you can take the course at whatever pace works for your schedule. All lesson guides and videos will be available to you from day 1. Study as fast or slow as you wish and complete assignments whenever you’re ready. To learn more about how the course works, visit this information page.
Throughout the course, you will have unlimited email support with a direct address to Nick Carver. Emails are typically answered within 2 business days depending on my volume of emails. Phone and/or online chat support is also available for an additional charge. Drop me a line for rates at .
6 Lesson Guides | 9 Videos
self-paced online course
[?]
- 139 Pages of Material
- 2 Hours of Video
- Unlimited Email Support
- Lifetime Course Access
- Satisfaction Guaranteed [?]
$200 Now $99
Add to Cart